Duplicate photos take lots of unnecessary space on your computer. Duplicate photos can be deleted manually but manually deleting duplicate photos will take lots of time and effort.
The best way to remove duplicate photos is to use a dedicated duplicate photo finder program. There are different duplicate finder programs available on the internet. One of the best duplicate photo finder tools is Duplicate Photos Fixer pro.
Using Duplicate Photos Fixer will scan your computer and then you can use the auto mark feature to delete the duplicates.
Let’s look at the Duplicate Photos Fixer program:
Duplicate Photos Fixer is a great duplicate finder and remover tool for your computer. It is one of the best duplicate photo finder tools you can find on the internet. This program will find all the duplicate photos on your computer and other drives. Once all the duplicates are found, you can auto mark the duplicate using the auto mark feature of this program and then remove the duplicates.
This program will help you find identical duplicates and similar pictures.
Let’s look at the features of this program:
Easy to use interface:
Duplicate Photos Fixer has a simple and easy-to-use user interface. This program can be used by anyone to delete duplicates.
Different comparison modes:
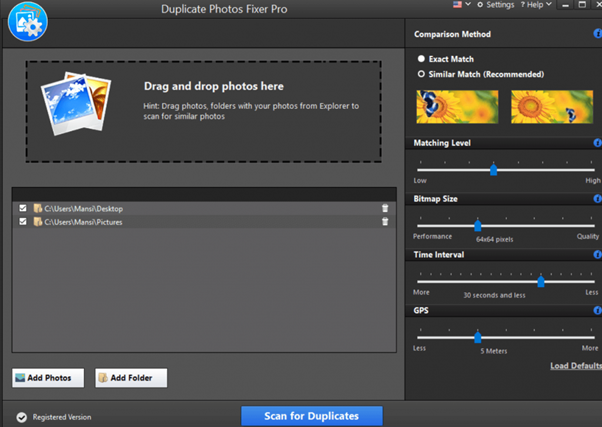
There are two main comparison modes in this program. These comparison modes will help you to find duplicate photos.
- Exact Match Criteria: This criterion will help you to find identical photos.
- Similar Match Criteria: Using this criterion you can find similar-looking images. You can set the similarity level according to your needs.
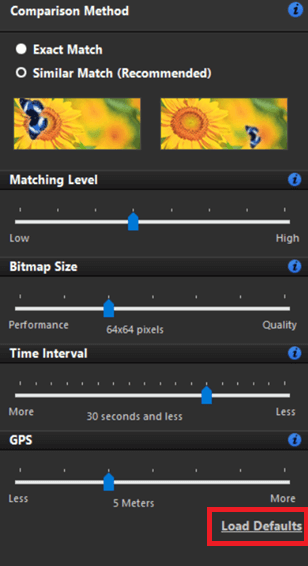
Similar match criteria have different settings that you can use to set the similarity level.
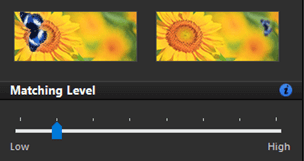
- Matching Level –Using a matching level you can change the similarity between two images. A low matching level will find the images will lower similarity.
A high matching level will increase the similarity between images.
Bitmap Size – It will match the pixels x pixel to compare the pictures.

Time Interval – It will compare the time difference between two images.

GPS = It will compare the geo location between two similar pictures.

Load Defaults = You can use this button to change all the settings to default.
Main settings of this program:
To go to the settings, click on the top right corner of the program window:
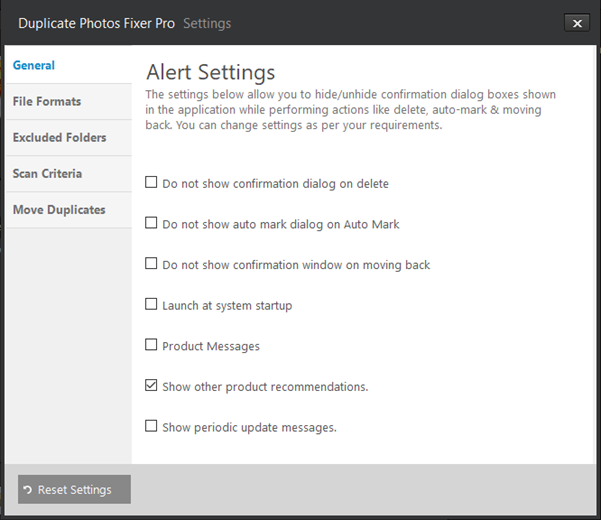
- General – You can change the setting like to Show the auto mark dialog on Auto Mark or not, showing confirmation on Delete, show confirmation on moving Back, Launch at System Start-up & Product Messages.
- File Format – This will show all the file formats that are supported by the program. You can uncheck the file that you do not want to be included in the scan. Also, you can change the minimum size of the pictures to be scanned.
- Exclude Folders – Any folder you do not want to be scanned you can add to that list.
- Scan Criteria – If you want to disable Time Interval and GPS criteria you can do it from here. You can also check if you want to use Time Interval if Capture Date is missing.
- Move Duplicates – You can move the duplicates to the location of your choice.
Different Storages are supported:
You can scan both internal and external drives using this program. You can also scan Google drive and network location.
Auto-Mark the Duplicates
The main feature of this program is the Automark feature which will help you to delete duplicate photos easily. Once the scan is completed you will see all the duplicates. Once the duplicates are found you can simply use Auto
Mark function in this program to automatically mark the duplicates.
Once the duplicates are marked you can then simply remove them.
How To Use Duplicate Photos Fixer Pro to auto mark the duplicates for deletion?
Using Duplicate Photos Fixer is very easy. Let’s look at the steps below to use the program for deleting the duplicates automatically:
STEP 1 – Download and install Duplicate Photos Fixer from the link.
STEP 2 – Once installed just launch the program.
STEP 3 – On the main screen of the program you have to add the location for scanning.
STEP 4 – Once the location is selected you just have to click on Scan for Duplicates button.
STEP 4 – Upon the completion of the scan you will see all the duplicates.
STEP 5 – To auto mark the duplicates you have to click on the Auto Mark button the duplicates.
Once you click on the Auto Mark button you can set the auto mark criteria. This will help you to auto-mark the duplicates according to your needs.
Once the duplicates are marked you can delete the duplicates.
Verdict
Duplicate Photos Fixer will help you to auto mark the duplicates for deletion. Once the duplicates are found you can simply use the Auto mark function available in the program. You can mark the duplicates according to your needs and then delete them.
Author Bio:
Camila Saunders is a tech blogger. She loves to share insightful guides and tactics that convert traffic. She majorly focuses on Windows and Mac. She also loves to write about duplicate photos and driver updater software.

